All posts in Features

Spell Check your DORA CREC Contracts

We love our users in Colorado and we do our best to please them.  Since our launch about a year ago we have added multiple features to our product, most of them at the request of our users.  One feature we did not expect to add was spell checking. We prefer modern browsers such as Chrome, Firefox and Safari, which include spell check. However, we did see the value in spell checking entire DORA CREC contracts at one time as opposed to just one field or tab as the browsers currently do.  More importantly Colorado Real Estate Agents were begging us for this feature and most of our users prefer Internet Explorer by an overwhelming amount.
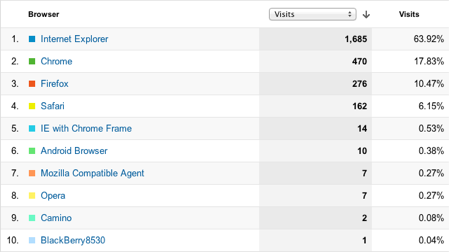
BULL Forms Colorado DORA CREC Contracts Browser

As we continue in our quest to become the default DORA CREC Contracts generator for Colorado Real Estate Professionals we have added the ability to spell check your entire contract by clicking on one button.

Spell Check Feature Walkthrough

You may have noticed there is a new button available in the toolbar, illustrated below:

BULL Forms Colorado DORA Spell Check Button

Clicking on this button from within a contract will bring up the spell check and will check the entire contract.   A window will pop up and the interaction should feel similar to what you are used to with your word processors.
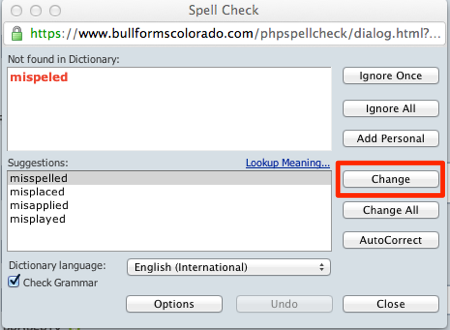
BULL Forms Colorado DORA Spell Check Window

If there are any misspellings in your contract, it will appear in the top window, along with suggestions for the misspelled word in the bottom box.  If you would like to change the word, click on the change button.  You will then be taken to the next misspelled word in your contract, if there are any.

Once the spell check is completed for your DORA CREC Contracts you are presented with a summary of the changes made:
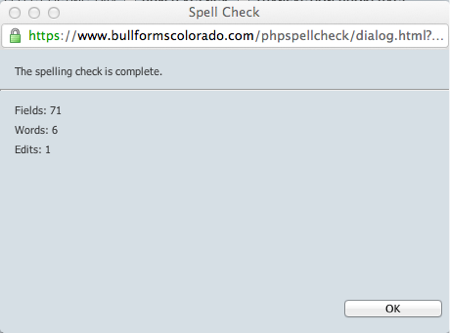
BULL Forms Colorado DORA Spell Check Summary

Hopefully you enjoy this new feature.  As always, please let us know if you have any other questions or concerns.

Thank you,

BULL Forms Support

To learn more about our DORA CREC Contracts Form Solution, click here.
Colorado Sellers Property Disclosure

Colorado Sellers Property Disclosure

As a Colorado real estate professional you are aware that your seller’s must complete the Colorado sellers property disclosure for their property. The current workflow typically entails emailing your clients the property disclosure and then waiting for them to complete it (many times with multiple revisions), sign and date the form and then send it back to you via fax or email.  In addition to degrading the quality of your document due to multiple transmissions back and forth, you are wasting precious time waiting for your customer to fax or email the property disclosure back to you.

Our goal at BULL Forms has always been to make your jobs easier. Completing the DORA Colorado Sellers Property Disclosure should not require hours of work.  Great news, we just launched a new feature… Share

Sharing a CREC Contract

Once you are ready to share a form, click on the share icon from within your form, outlined in red below:

BULL Forms Colorado DORA Share Icon

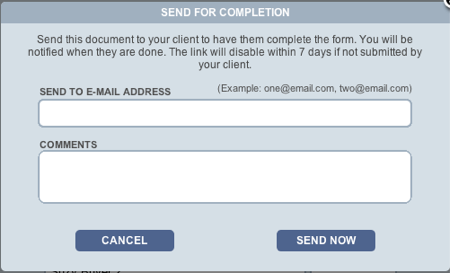
Once clicked, a window will open requesting that you enter the information on the parties that you would like to share the document with.

Send Colorado Sellers Property Disclosure For Completion

You can send the email to multiple parties by entering a comma between each of the emails.  Also, you should enter some descriptive comments so that the parties you are sharing your document with are aware of what and why they are completing the form.

Once completed, the parties will receive an email like the one illustrated below:

BULL Forms Colorado DORA Share Email

The link will expire after 7 days.  If the parties you shared the form with are having issues clicking on the email, instruct them to copy and paste the link into their web browser.  Once they have clicked on the link they will be taken to the Division of Real Estate contract you chose to share with them.  It should look familiar to you as it is similar to our classic view.

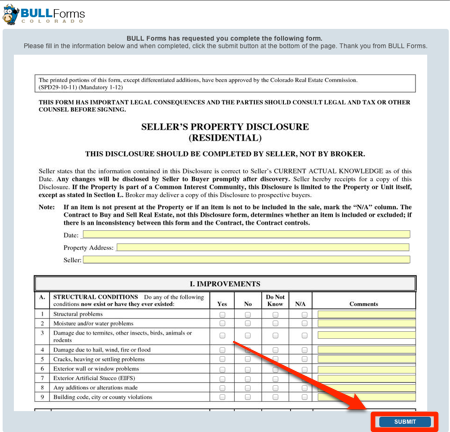
Once they have completed entering their information in their Colorado sellers property disclosure they will click on the submit button, as pictured below:

Colorado Sellers Property Disclosure Screenshot

Once your clients click on the submit button, you will receive an email informing you that the parties have completed the form you requested.  The email is sent to the account you have registered with BULL Forms Colorado and looks like the image below:

BULL Forms Colorado DORA Sharing Completed

When you log back into your account the form will have all of the information your parties entered into the document.  You can now send this document to them for e-signature.

The sharing feature is available for all of the forms, therefore, you can share a contract with an attorney if they would like to review a contract or with any other interested parties.

Thank you and we hope this speeds up your Colorado sellers property disclosure tasks.

The BULL Forms Team

Auto Insert N/A into Colorado Real Estate Contracts

What to Do With Blank Fields In Your Colorado Real Estate Contracts

Here at BULL Forms we are constantly striving to offer the best real estate contract software to all of our users.  We include e-signatures and unlimited file storage at no additional cost.  We are constantly adding features and improving our product based on feedback provided by our users.  We love feedback!

All too often we write a new blog post and it starts off with, “based on customer requests we have added a new feature”, but here we are again…  Our customers were frequently requesting a way to insert N/A into all of the empty fields in their Colorado real estate contracts.  We have added this functionality and you can activate the feature in under 4 clicks.

How to Enable Auto N/A in your Colorado Real Estate Contracts

First step, click on dashboard near the top right of the screen
to enter your dashboard area.

Colorado Real Estate Contracts Dashboard

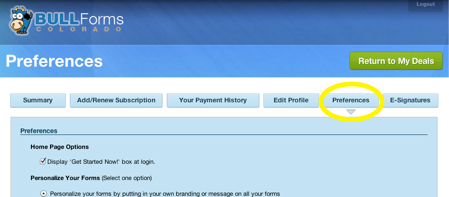
Once your dashboard is loaded up.  Click on the personalize tab:
BULL Forms Colorado DORA Preferences Tab
Scroll down to the bottom of the tab.  Under the autofill N/A section click on autofill N/A on and then click on the green update button:
BULL Forms Colorado DORA Click Here
As promised, 4 clicks and you have no enabled auto N/A insertion into all of the empty fields in your Colorado Real Estate Contracts.  Now every time that you generate a form, all of the empty fields will have an N/A inserted by default.  We feel like we know the next question you are going to ask.  “I don’t want N/A in all of the fields, just most, how do I remove the N/A from one field?”
Great question, to have a field show up as blank, simply enter 1 space into the field you do not want anything printed in.  Please ensure you are only entering 1 space, if you enter 2 spaces N/A will print in the field.
Thank you for your continued support and we hope we are making your Colorado Real Estate Contracts solution easier.
BULL Forms

DORA Contracts E-signatures Explained Part I

DORA Contracts E-Signature

We recently launched an updated e-signature function to assist you in e-signing your Colorado Real Estate Commission Forms.  While the functionality is much more robust, to take advantage of all the features it might help to have them explained in detail for you.  This is part I in our series explaining the features of our e-sign feature.

The E-signature Control Panel

The e-signature control panel is where the “magic happens,” from here you can control all aspects of your DORA e-signature transactions.  Pictured below is a screen shot of the first screen you will see when you enter the control panel.

Colorado Real Estate Commission Forms DORA Contracts E-signature Control Panel

There are four tabs near the top of the screen, as highlighed in the screenshot.

1. Pending transactions:  All of the documents that you have sent out for e-signatures will be listed here until all parties in the transaction have signed the document.

2. Completed transactions: all transactions in which all parties have signed will be listed here.

3. Canceled transactions: all transactions that were canceled at any point during the signature process will be listed in this tab.

4. My documents: all of the documents that you have sent out for e-signatures and have chosen to save for use at a later time will be listed in this tab.

Working with transactions

BULL Forms Colorado Real Estate Commission DORA e-signature pending transactions

From within the pending transactions tab you will see all of your DORA Contracts that are currently pending e-signature in the area highlighted above.

If you wanted to check on the status of one of your pending transactions, you can retrieve more information by clicking on the blue triangle to the left of the transaction name.

BULL Forms Colorado DORA Forms e-signatures triangle

Once you click on the triangle the current status of the transaction will be displayed, as illustrated below:

BULL Forms Colorado DORA Forms esignatures expanded

In the expanded view you will see all of the participants in the transaction and if they have signed the document and the time they signed the document.

Available Functions

  • View PDF: Clicking on the view PDF button will open the document for viewing. You will see all of the signatures placed on the document as well as the transaction log, which is appended to the last page of the document.
  • Edit Transaction: Clicking on the edit transaction button will open the advanced e-signature panel, where you can add parties and place signatures.
  • Cancel: This button will cancel the entire transaction.  Only the party that is currently inline for signatures will be notified of the cancellation.
  • Edit Email: Next to the party’s email address there is an edit link, clicking on it will give you the ability to update the party’s name and email address.
  • Resend Email: Clicking on this button will resend the e-signature email to the party, this email includes the link that the party will need to click on to sign the documents.
That is all for now.  Please be sure to follow us on twitter and Facebook.

Colorado Real Estate Contracts in Color

If you have not checked out some of our other new features, please do so by clicking here.

The information you input into DORA Colorado Real Estate Contracts now shows up  in the color of your choosing!

As usual, our users have continued to provide us with invaluable feedback. Another frequently requested feature was the ability to complete DORA Colorado Real Estate contracts with different color fonts to differentiate the agent generated information from the information on the standard real estate contract.

Good news as BULL Forms now supports this feature.  Let’s take a look at how you can set your account to print DORA Colorado Contracts in different color fonts.

First, login to your dashboard, and click on the preferences tab:

Once on the preference tab, scroll down to the bottom of the page:

As you can see, you have the option of the default black text, or you can opt for Blue or Red font colors.  Once you have made a change, click on the update button.  Moving forward all of the information you add to the DORA Colorado Real Estate Contracts will appear in the color you selected.
If you don’t already, please follow us on twitter.

If you have any other questions, please contact us via our contact form.

DORA Contracts Clause Library

We have been busy introducing new features lately, check out our unlimited additional provisions and if you don’t already, please follow us on twitter.

New Clause Library Feature for Colorado DORA Forms

As of last week BULL Forms Colorado has had a clause library available for all DORA Colorado Contracts. As with most features, we try to make them as easy to use as possible. Let’s take a brief walkthrough of the feature.

You can use the clause library to insert your favorite clauses in any field where you see the green + next to field label, like this one;

DORA Colorado Contracts Clause Library Icon

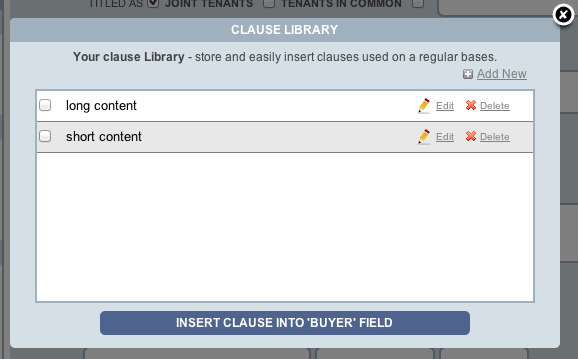
When you click on the green + button, the clause library will open:

DORA Colorado Contracts Clause Library Main Window

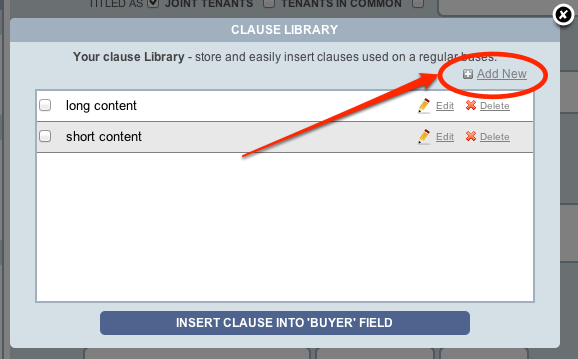
From within this window you can create, edit, delete and insert clauses into your DORA Colorado Contracts.  To add a new clause click on the add new button near the top right corner of the window:

DORA Colorado Contracts Clause Library Add New

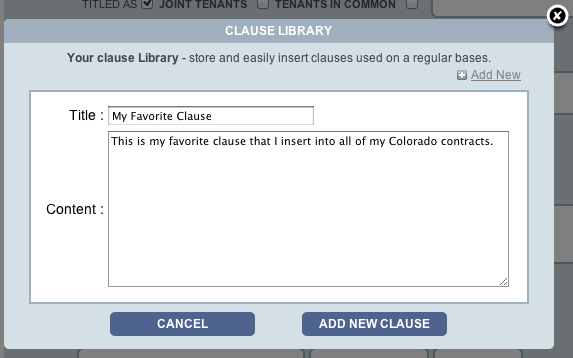
When adding a new clause, you select a title for your clause and enter as much text as you like into the content.  If you are inserting a long clause into a small field the text will cut off, so please ensure you pay attention where you are inserting your clauses.

DORA Colorado Contracts Clause Library Add New View

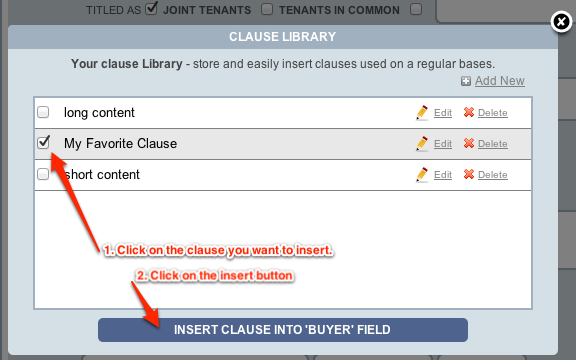
Once the new clause is added it will appear in your main clause library window.  When you are ready to insert a clause into the DORA Colorado Contract, select the clause you would like to insert and click on the “insert clause” button as illustrated below:

DORA Colorado Contracts Clause Library Insert

The clause will automatically be inserted into the field.  If there is text currently in the field, the inserted clause is appended to the end of the current text.

DORA Colorado Contracts Clause Inserted

Thank you,

BULL Forms Team

Unlimited Additional Provisions for DORA Contracts

Additional Provisions for DORA Contracts

If you don’t already, please follow us on twitter!

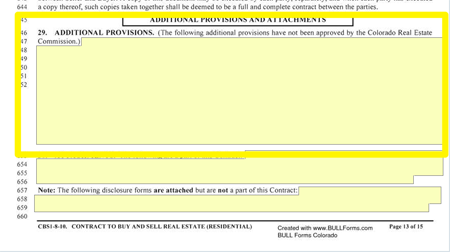
During our short time of existence one of the most frequently requested features was for more space in the additional provisions field in many of the DORA contracts.  When BULL Forms Colorado initially launched we only had about 250 characters of space in many of the DORA contracts.  We quickly discovered that this was not even close to enough space.

While we have made incremental improvements to the size of the additional provisions fields for the DORA contracts, it was never quite enough.  While on the phone with some of our users they indicated they sometimes included up to three pages of additional provisions.

Upgraded Additional Provisions

We currently are supporting unlimited additional provisions in all of the DORA Sales Contracts.  There is no change to the end user, there are just no longer any restrictions on the amount of information that can be input into these fields.

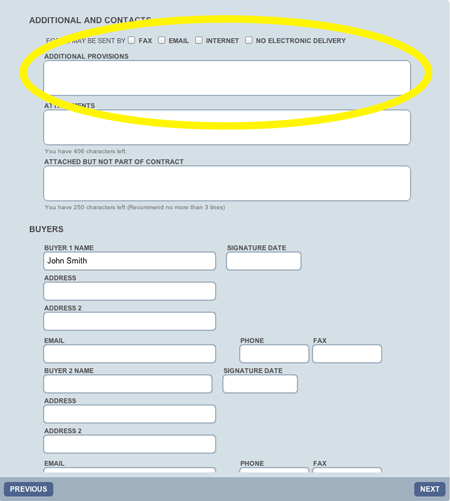
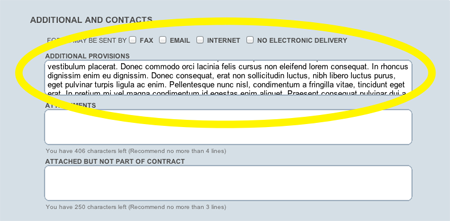
Here is a preview of the additional provisions field in our “easy view”

Additional Provisions on DORA Contracts

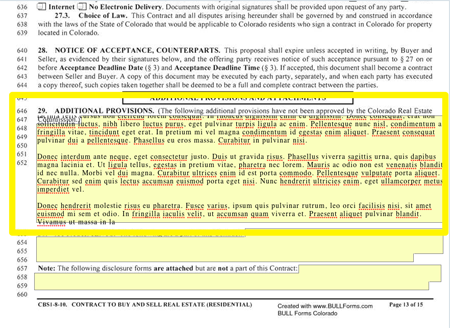
and here is the field in our classic view:

For the purpose of illustration we are going to insert some of our favorite developer text into the field (Lorem Ipsum).

Easy View:

DORA Forms Additional Provisions Filled In

Classic View:

DORA Forms Additional Provisions Filled In

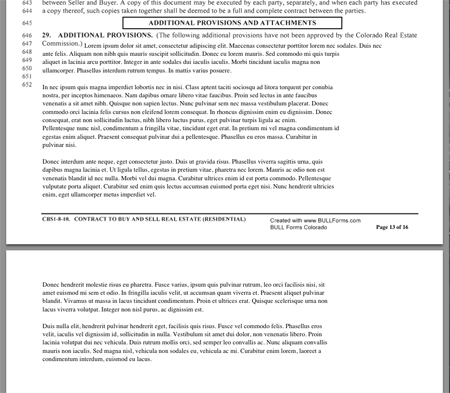
When we print the contract BULL Forms Colorado will automatically calculate the additional pages required to fit all of the additional provisions you enter into your DORA contracts.

DORA Contracts Additional Provisions PDF

Thank you,

BULL Forms Team

Don’t forget you can also e-sign all of your DORA Contracts!

DORA Colorado Contracts E-signature Version 2.0

We are excited to announce that we have launched an upgraded version of our e-signature feature for DORA contracts.  In addition to being able to upload any PDF documents and send them out for signature you also have much more control over the entire e-signature process.  DORA Colorado contracts still have all of the signature and initial locations pre-mapped, so you do not have to spend any time configuring the locations. Please check out our introductory video below:

Thank you, BULL Forms Team

DORA Colorado Contracts – Autofill Update

BULL Forms Colorado has updated our autofill feature

One of the most frequently requested feature updates by our Colorado real estate agents is autofill. When we first launched our product we struggled with how to best implement the autofill feature. We chose to roll it out with limited functionality and improve upon it based on user feedback.

Based on our Colorado user feedback we have upgraded the autofill function.  You can now choose which side of the transaction you are representing, either the buyer or seller. You can now also pre-populate up to 4 buyers and sellers on the DORA CREC contracts.

Below is a brief walk through of the update:

You can access the autofill fields at any time from within a deal by clicking on the icon next to the deal name:

BULL Forms Colorado Autofill Icon

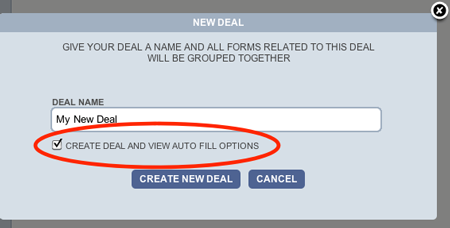
Autofill is also accessible when you first create a deal by checking “create deal and view auto fill options”:

BULL Forms Colorado New Deal Auto Fill

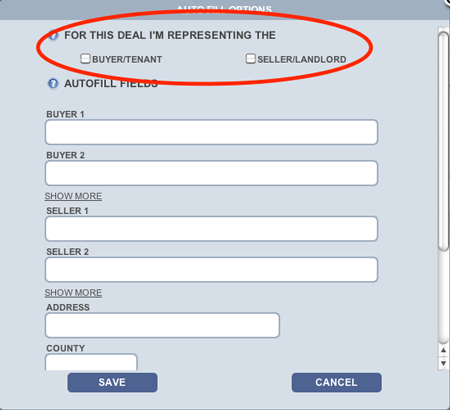
Below is what the auto fill window will look like when it is first opened.  The top portion of the window is where you select which side of the transaction you are representing.  If you are representing the buyer, click on the buyer radio button and all of your information will be pre-populated on the buyers side of the DORA contracts.

BULL Forms Colorado Auto Fill Representing

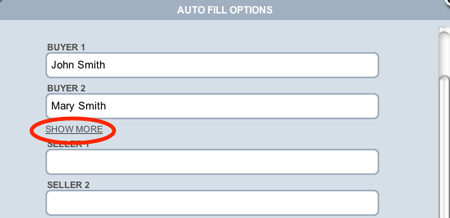
When entering buyers and sellers you now also have the option to include up to 4 buyers and sellers. Click on the show more button to add more buyers:

BULL Forms Colorado Add Buyers Autofill

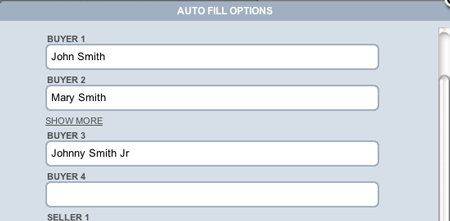
You will now have two additional fields to add buyers 2 and 3 to the transaction:

BULL Forms Colorado Auto Fill 4 Buyers

You have just added these 3 buyers to all of the contracts that you create within this deal.  If at any time you would like to update any of the information you can open the autofill window and change the information. This will affect all of your forms within the deal moving forward.

As always we want to hear your feedback. We want to find out if you would like changes in the autofill function to be applied to all of your previous contracts in the deal.

Cheers,

BULL Forms Team

DORA Forms and File Storage = Ultimate Real Estate Tool

BULL Forms is proud to announce the launch of our fully integrated file storage solution.

What does this mean for agents using our product to generate DORA forms?

All BULL Forms Colorado users can now upload, share and store all of their files easily using the same familiar interface they have become accustomed to. There is no additional charge to our users and all users have unlimited file storage!

You no longer have to use multiple programs, frequently jumping between programs. Instead you can now easily upload multiple files into your deal and you will have all of the information you need in one easy to access location. Your files are automatically synced into the cloud and available from any computer with internet access using your account credentials.

Let’s see how the file storage solution works. When you log into your account you will now notice that there is a file icon on each one of your deals:

BULL Forms Colorado File Storage Icon

Click on the “files” icon to be taken into the file navigator:

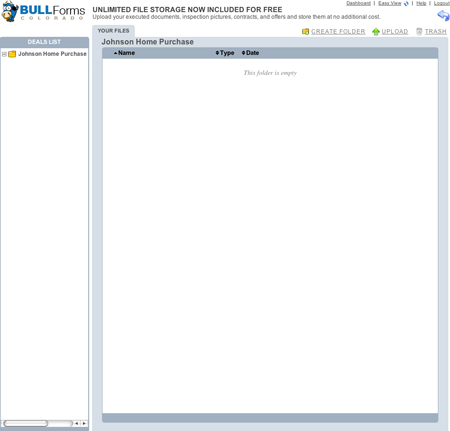
BULL Forms Colorado File Storage Dashboard


Once within the files dashboard you will be able to navigate between deals to view all files in each of your files.  All of your deals will automatically be listed on the left hand side of the window.  Please note: If you delete a deal, you will delete all associated forms and files!

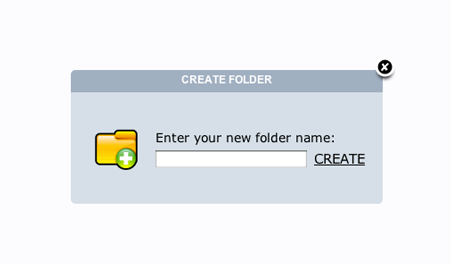
From the main screen you can choose to create a folder or upload files.  If you want to keep your files nice and neat, you may want to add a new folder, you can do so by clicking on the “Create Folder” icon, you will be prompted to name the folder, as pictured below:

BULL Forms Colorado File Storage Create FolderType in your desired folder name and click create or enter to create the folder.  Here is what the folder you just created will look like:

BULL Forms Colorado File Storage Folder ListDouble click on the new folder to jump in and view its contents.

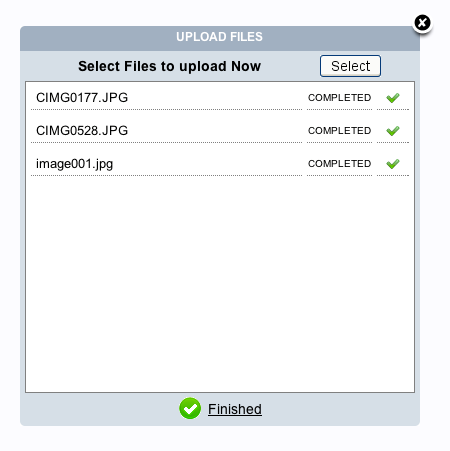
To upload files lets click on the “Upload” icon.  Click on the “Select” button near the top right corner.  Your browser’s file manager will open.  Select all of the files that you wish to upload.  You can select as many files as you like. Once you have started uploading files you will be shown your progress.  Once all uploads are complete you will see a window like this:

BULL Forms Colorado File Storage UploadedIf you are done uploading files you can click on the “finished” icon or the “X” on the top right corner of the window. You will now see your files, as illustrated below:

BULL Forms Colorado File Storage Uploaded FilesYou have the option to rename, download, share or delete each file.  If you want to send your client or co-worker a file, but don’t want to download and email the file, you can share the file with one click.  Click on the “Share” icon. The file will be shared, and you will see the following:

BULL Forms Colorado File Storage Shared

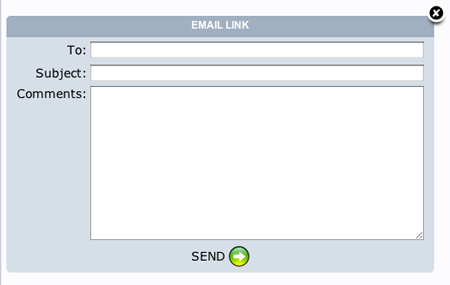
Click on the email link and you will see the email window:

BULL Forms Colorado File Storage Email Link

Your client or coworker will receive an email with a link to the file that you have shared. Be careful as this file will be available to any party with the link.  The public view of the file will look like this:

BULL Forms Colorado File Storage Public ViewAll of us here at BULL Forms hope that you enjoy the file storage solution and integrate it into your Real Estate Offices. You now have one location to generate your DORA Colorado Contracts and save all of your files!

As always, if you have any feedback or feature recommendations, please do not hesitate to contact us.  You will be surprised how quickly we respond.

Thank you,

BULL Forms Team